Activities
At MagiMo, we believe in more than just providing products; we aim to make your Thanksgiving feast even more memorable! These aren't just fun—they're opportunities to connect, laugh, and bond as you pass the gravy and create memories that will last long after the leftovers are gone! Whether it's crafting a turkey, playing a silly game, or sharing what you're grateful for, these moments will become traditions your family will cherish for years to come!

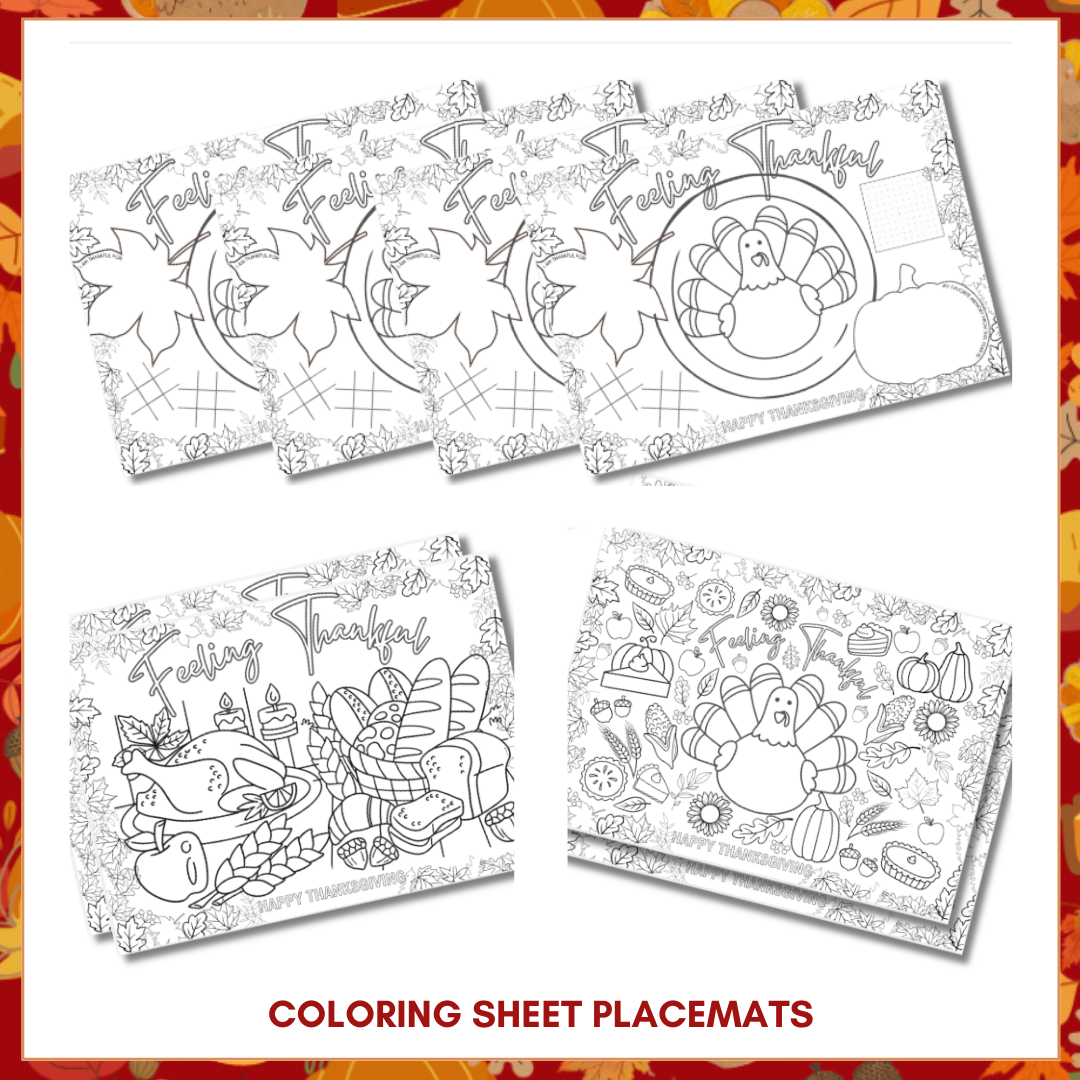
Coloring Page Placemats
Our Thanksgiving box includes two sets of coloring page placemats for each guest! One set is all about creativity, filled with fun illustrations to color. The other set has classic games and playful prompts to spark conversation and keep everyone entertained—perfect for adding a little extra joy to the holiday table. 🍂🖍️
Additional Activities with supplies easily found at home

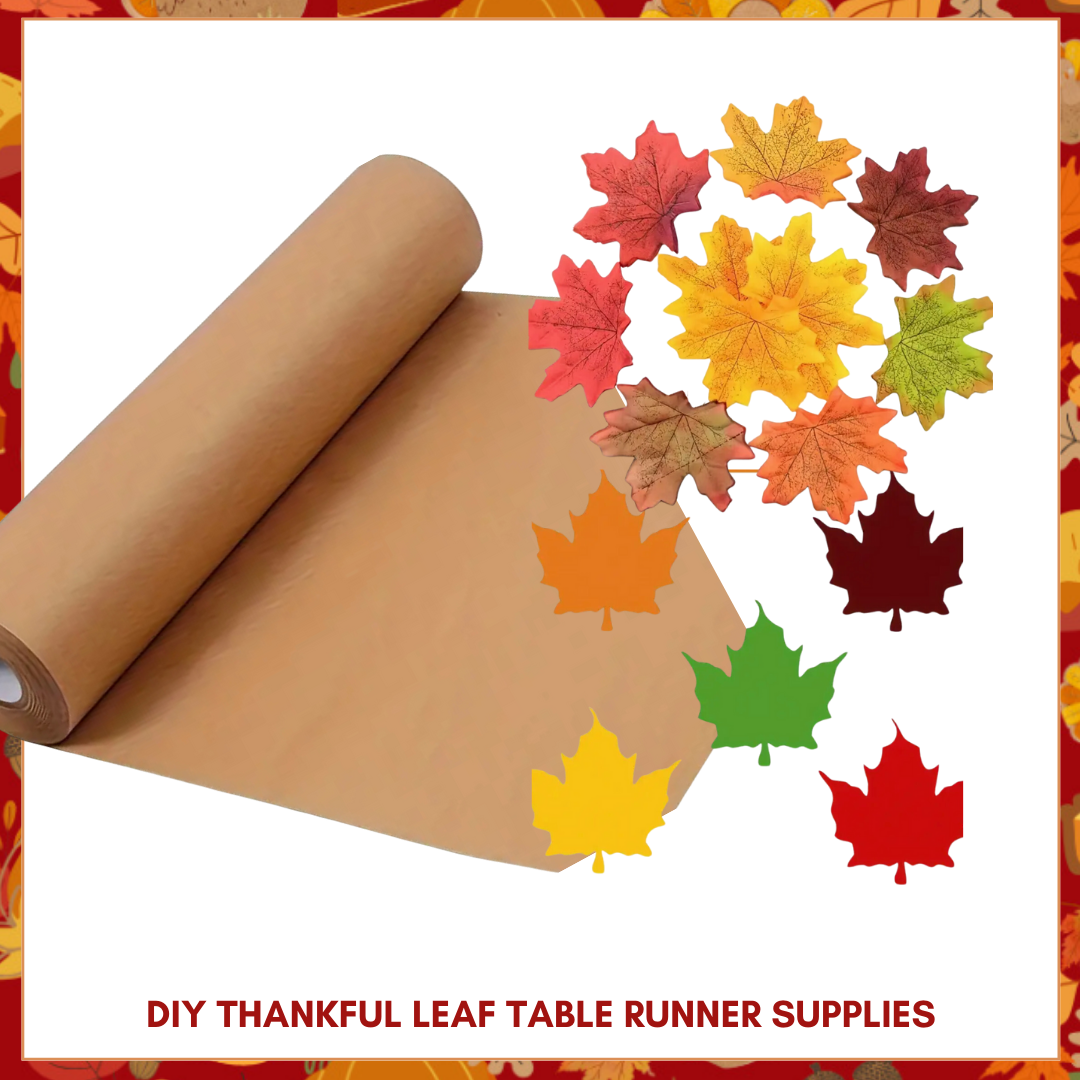
DIY Thankful Leaf Table Runner
This Thanksgiving, create a table runner that’s as full of gratitude as it is color! Create a DIY Thankful Leaf Table Runner turns thankfulness into a beautiful centerpiece for your holiday celebration.
IThis easy DIY brings the whole family together, sharing messages of gratitude on each leaf. Simply add the leaves to the kraft paper runner for a table filled with heart and meaning. 🍂✨
Imagine reading everyone’s “thankful for” messages over dinner—connecting, sharing, and celebrating together. 💛
SUPPLIES:
- Colorful leaves or colored paper (if you want more leaves)
- Leaves to trace as stencils for shapes
- Scissors
- Glue dots
- Pen or Sharpie type marker
- Roll of kraft paper
INSTRUCTIONS
Note: Depending on how long and full you want your table runner to be, you’ll need between 150 and 300 leafs that are roughly four inches in length.
1. Have family members write messages and notes onto some of the leaves that share what they are thankful for this Thanksgiving season.
2. Fold the leaves in half, like a hot dog, leaving an inch or more at the top of each leaf where it hasn’t been folded. This gives the leaves dimension so that they don’t just lie flat on the table runner.
3. Attach the leaves to the roll of kraft paper with glue dots, in a haphazard pattern. There is no right or wrong way to do it. You just want to make sure that you attach the leaves in such a way that it covers the kraft paper and looks full.
4. Continue adding leaves until the entire length of the table runner is complete.
5. Now, you’re ready to set the table and add this colorful DIY table runner as a decoration for the turkey feast.
Tip: You can read what everyone is thankful for over dinner, and try to guess who said what, as a fun game to interact with kids, friends, and family.

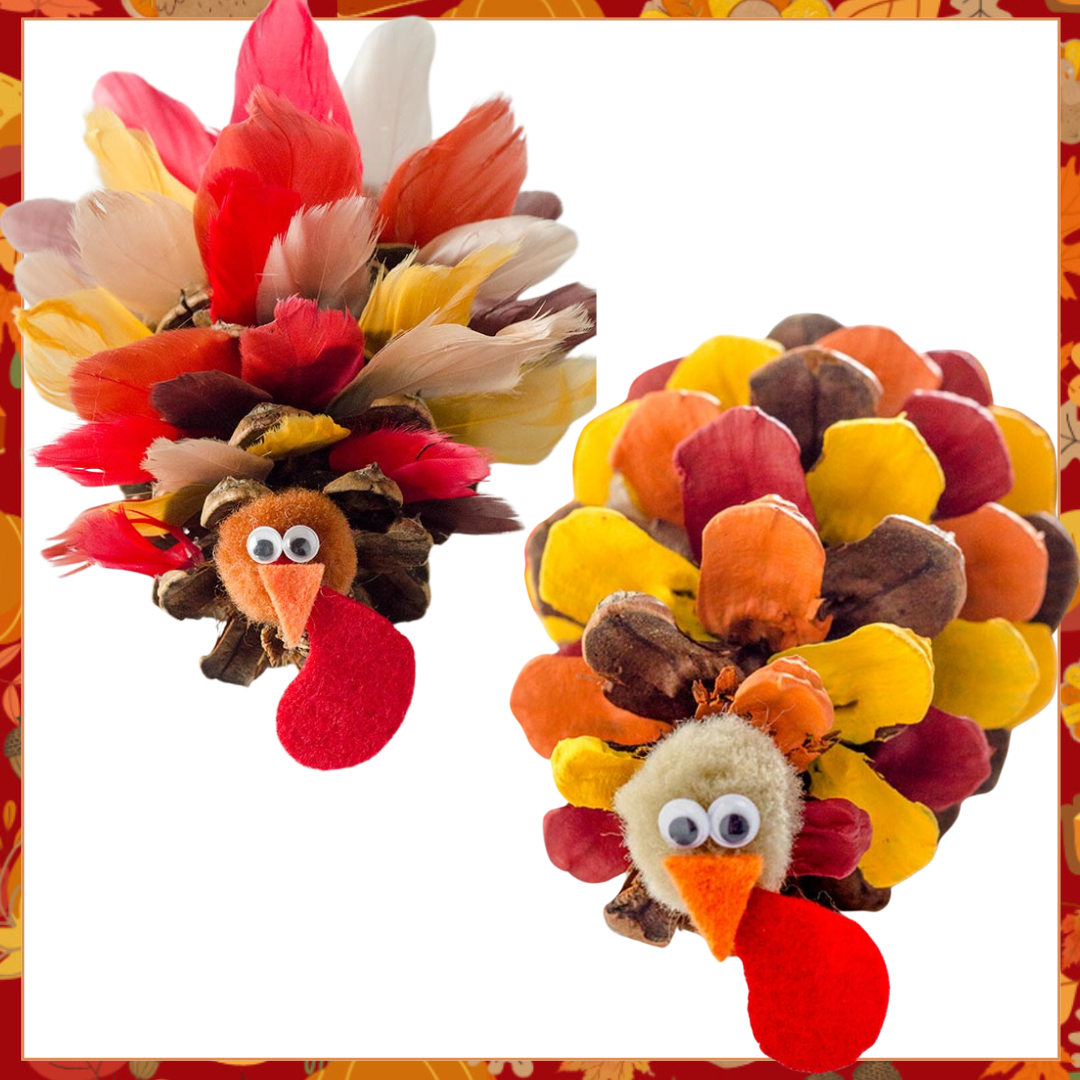
Pinecone Turkeys (2 Ways)
Here are two easy and simple ways to create these adorable turkeys at home...
This craft is great for kids of all ages and helps bring a little bit of nature indoors for Thanksgiving!
OPTION 1: PINECONES & FEATHERS
SUPPLIES:
- Pinecones (collected from outside or store-bought)
- Feathers (real, craft feathers, or cut from colored paper). Alternately you could use some of the colorful leaves provided in your box!
- Googly eyes (or draw eyes with a marker)
- Brown pom-poms or brown construction paper
- Glue
- Scissors
- Red and orange construction paper or scrap felt in both orange and red – orange for the beak, and red for the waddle
INSTRUCTIONS
- Prepare the Feathers: Cut feather shapes out of construction paper if you don’t have craft feathers. Or use some of the colorful leaves in your MagiMo box. Use bright colors like red, orange, and yellow to give your turkey a festive look.
- Attach the Feathers: Glue the feathers to the back of the pinecone to create a tail. Arrange them in a fan shape so they look like a colorful plume.
- Make the Turkey's Face: Glue two googly eyes on the brown Pom-Pom or cut a small circle out of brown construction paper. Cut a small triangle out of orange construction paper and glue below the eyes as the beak, and add a red paper wattle just beside it.
- Let It Dry: Allow the turkey to dry completely before handling. You can place your pinecone turkeys on the Thanksgiving table as place cards or just as cute decorations.
- Customize Your Turkeys: Kids can add extra details like hats, scarves, or glitter for a personal touch. Have fun creating a whole turkey family!
OPTION 2: PAINTED PINECONES
SUPPLIES:
- Pinecones (collected from outside or store-bought)
- Fall colored Paint (Dark Red, Bright Red, Orange, Yellow)
- Googly eyes (or draw eyes with a marker)
- Brown pom-poms or brown construction paper
- Glue
- Scissors
- Paint Brushes
- Red and orange construction paper or scrap felt in both orange and red – orange for the beak, and red for the waddle
INSTRUCTIONS
- Paint the Feathers: Start painting the pinecone scales. Start with one color (Example: yellow), then continue with the second color (Ex. Orange) and finally the third color (Ex. Red).
TIPS: Leave some of the scales natural because the brown color looks great with the red, yellow, and orange colors. When you’re painting the scales you want to make sure you are spreading each color around and not bunching all the reds in one area, etc. you need to try to disperse each color throughout. Also, you will probably find that you need to do 2 coats of paint. after you do the first coat for each color you should then be able to do the second coat almost right away – the paint dries relatively quickly. - Make the Turkey's Face: Glue two googly eyes on the brown Pom-Pom or cut a small circle out of brown construction paper. Cut a small triangle out of orange construction paper and glue below the eyes as the beak, and add a red paper wattle just beside it.
- Let It Dry: Allow the turkey to dry completely before handling. You can place your pinecone turkeys on the Thanksgiving table as place cards or just as cute decorations.
- Customize Your Turkeys: Kids can add extra details like hats, scarves, or glitter for a personal touch. Have fun creating a whole turkey family!

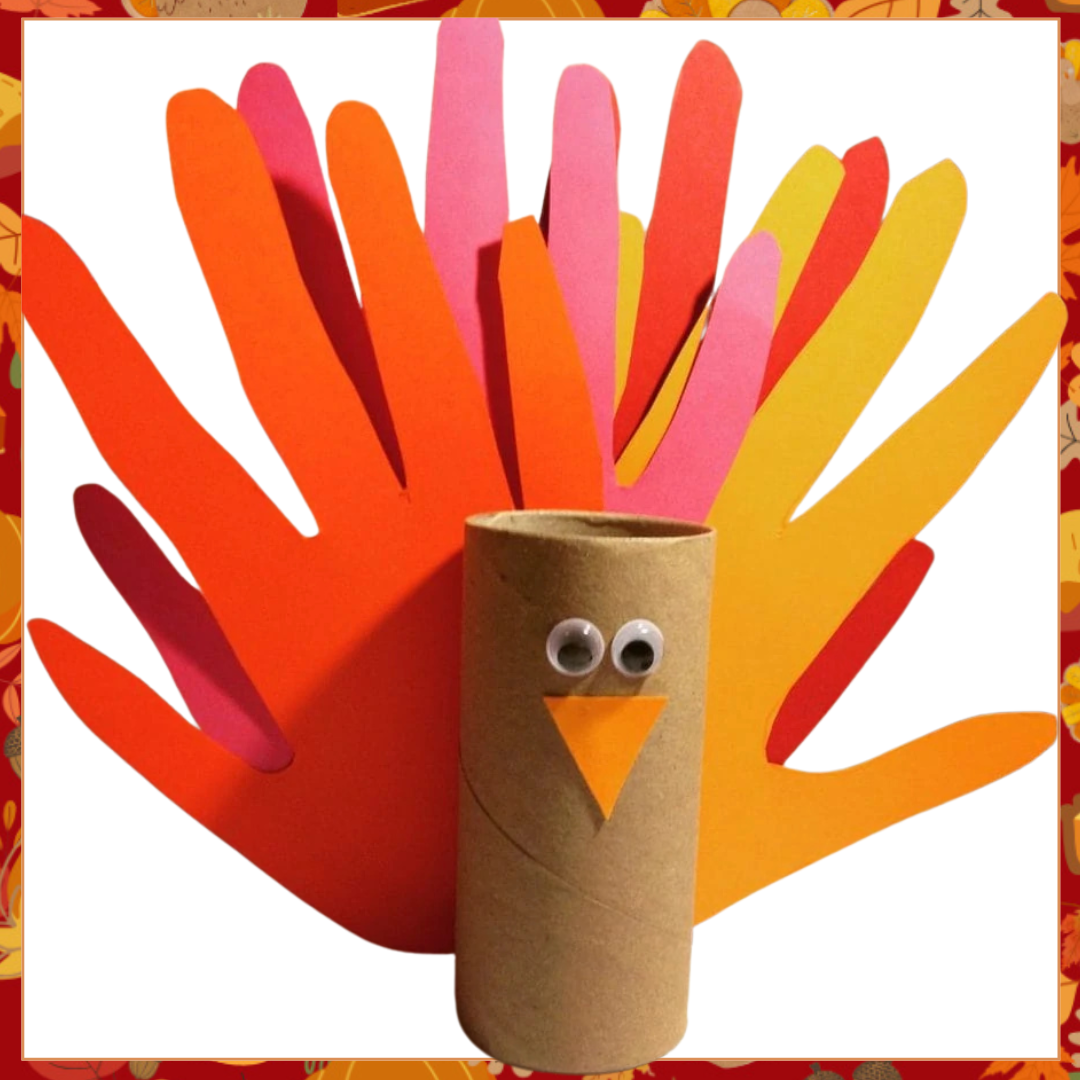
Handprint Turkey Napkin Rings
These adorable napkin rings double as keepsakes, making the Thanksgiving table extra special and reminding everyone of the fun family moments spent creating together.
SUPPLIES:
- Red, orange, and yellow construction paper (or any color you’d like to use!)
- Toilet paper rolls
- Scissors
- Glue
- Markers
- Googly eyes (optional)
INSTRUCTIONS
- Make the Handprint Feathers: Trace each child’s hand on the red, orange, and yellow construction paper and cut out the handprints. These will serve as the turkey's colorful feathers.
- Create the Turkey Body: Cut a toilet paper roll in half to create the body of the turkey. This will be the napkin ring. Glue googly eyes, or draw eyes with a marker. Cut a small triangle from orange paper for the beak and a squiggly piece from red paper for the wattle, then attach these to the face.
- Attach the Feathers to the Body: Glue the handprint feathers to the back of the napkin ring.
- Add Final Touches: Decorate the turkey with extra doodles, names, or little hats for extra cuteness.
- Use for Your Feast: Slide a napkin through each ring and set them on your Thanksgiving table for a personalized touch that showcases each child’s handprint art!
Printable Games & Activities
-
Thanksgiving 5-Seconds-Of-Fame Game [Printable-Digital File]
Regular price $2.99Regular priceUnit price / per$4.50Sale price $2.99Sale -
Thanksgiving Activity Pack [Printable - Digital File]
Regular price $5.99Regular priceUnit price / per$8.99Sale price $5.99Sale -
Thanksgiving Bingo [Printable - Digital File]
Regular price $3.99Regular priceUnit price / per$6.99Sale price $3.99Sale -
Thanksgiving Charades Game [Printable-Digital File]
Regular price $2.99Regular priceUnit price / per$4.50Sale price $2.99Sale -
Thanksgiving Conversation Starters and Table Game Cards [Printable - Digital File]
Regular price $2.99Regular priceUnit price / per$3.99Sale price $2.99Sale -
Thanksgiving DIY Spirit Pennants [Printable - Digital File]
Regular price $3.99Regular priceUnit price / per$5.99Sale price $3.99Sale -
Thanksgiving Family Feud [Printable - Digital File]
Regular price $4.99Regular priceUnit price / per$7.99Sale price $4.99Sale -
Thanksgiving Food & Drink Tent Cards & Table Place Cards [Printable - Digital File]
Regular price $2.99Regular priceUnit price / per$5.99Sale price $2.99Sale -
Thanksgiving Forbidden Words [Printable-Digital File]
Regular price $2.99Regular priceUnit price / per$4.50Sale price $2.99Sale -
Thanksgiving Gratitude Scavenger Hunt [Printable-Digital File]
Regular price $2.99Regular priceUnit price / per$4.50Sale price $2.99Sale -
Thanksgiving Holiday Countdown [Printable - Digital File]
Regular price $2.99Regular priceUnit price / per$3.99Sale price $2.99Sale -
Thanksgiving Lunch Notes [Printable - Digital File]
Regular price $1.99Regular priceUnit price / per$2.50Sale price $1.99Sale -
Thanksgiving Memory Match Game [Printable - Digital File]
Regular price $0.99Regular priceUnit price / per$2.50Sale price $0.99Sale -
Thanksgiving Minute-To-Win-It [Printable-Digital File]
Regular price $3.99Regular priceUnit price / per$6.99Sale price $3.99Sale -
Thanksgiving Photo Props [Printable - Digital File]
Regular price $3.99Regular priceUnit price / per$6.99Sale price $3.99Sale -
Thanksgiving Thank You Cards [Printable - Digital File]
Regular price $1.99Regular priceUnit price / per$2.50Sale price $1.99Sale -
Thanksgiving Trivia [Printable-Digital File]
Regular price $1.99Regular priceUnit price / per$2.99Sale price $1.99Sale

![Thanksgiving 5-Seconds-Of-Fame Game [Printable-Digital File]](http://magimoboxes.com/cdn/shop/files/22_5SecondGame.png?v=1729084464&width=533)
![Thanksgiving Activity Pack [Printable - Digital File]](http://magimoboxes.com/cdn/shop/files/2_ActivitySheetPack.png?v=1729086072&width=533)
![Thanksgiving Bingo [Printable - Digital File]](http://magimoboxes.com/cdn/shop/files/17_Bingo_c72ca692-0af6-4480-bb9b-f561c393a059.png?v=1729086401&width=533)
![Thanksgiving Charades Game [Printable-Digital File]](http://magimoboxes.com/cdn/shop/files/15_Charades_db8e03f2-1141-4f48-855a-0000bfa2f6d9.png?v=1729086842&width=533)
![Thanksgiving Conversation Starters and Table Game Cards [Printable - Digital File]](http://magimoboxes.com/cdn/shop/files/3_StoryStarters.png?v=1729152705&width=533)
![Thanksgiving DIY Spirit Pennants [Printable - Digital File]](http://magimoboxes.com/cdn/shop/files/9_DIYSpiritPennants_ed1c2c10-5093-457e-a085-80657274b4b3.png?v=1729086978&width=533)
![Thanksgiving Family Feud [Printable - Digital File]](http://magimoboxes.com/cdn/shop/files/Family_Feud_18d2c5f4-f47c-4df2-b5cd-05454f42f2e6.png?v=1731504395&width=533)
![Thanksgiving Food & Drink Tent Cards & Table Place Cards [Printable - Digital File]](http://magimoboxes.com/cdn/shop/files/4-5_FoodDrinkSigns_Placecards.png?v=1729152314&width=533)
![Thanksgiving Forbidden Words [Printable-Digital File]](http://magimoboxes.com/cdn/shop/files/21_ForbiddenWords.png?v=1729152100&width=533)
![Thanksgiving Gratitude Scavenger Hunt [Printable-Digital File]](http://magimoboxes.com/cdn/shop/files/12_Scavenger_Hunt_87614280-0dab-4c55-bfe5-e77fa6519a8e.png?v=1729151993&width=533)
![Thanksgiving Holiday Countdown [Printable - Digital File]](http://magimoboxes.com/cdn/shop/files/1_HolidayCountdown.png?v=1729087906&width=533)
![Thanksgiving Lunch Notes [Printable - Digital File]](http://magimoboxes.com/cdn/shop/files/23_Lunch_Box_Notes.png?v=1731544187&width=533)
![Thanksgiving Memory Match Game [Printable - Digital File]](http://magimoboxes.com/cdn/shop/files/14_MemoryMatch.png?v=1729087115&width=533)
![Thanksgiving Minute-To-Win-It [Printable-Digital File]](http://magimoboxes.com/cdn/shop/files/18_MinuteToWinIt.png?v=1729087625&width=533)
![Thanksgiving Photo Props [Printable - Digital File]](http://magimoboxes.com/cdn/shop/files/8_PhotoProps.png?v=1729087414&width=533)
![Thanksgiving Thank You Cards [Printable - Digital File]](http://magimoboxes.com/cdn/shop/files/24_Thanksgiving_Cards.png?v=1731552896&width=533)
![Thanksgiving Trivia [Printable-Digital File]](http://magimoboxes.com/cdn/shop/files/11_Thanksgiving_Trivia.png?v=1729152859&width=533)